Wednesday, December 29, 2010

Placemats & Napkins

 Now that my Christmas gifts have been given...I can reveal my secrets. This is a set of placemats & napkins I made for my soon to be mother-in-law.


 The breakfast table on Christmas morning.


Tuesday, December 28, 2010

Merry (Belated) Christmas

I didn't do any holiday baking this year...my shopping was done quickly and efficiently...so I needed a little holiday craft to get me in the holiday mood - these felt ornaments did just the trick!


I will confess that I was sewing them at the last minute on Christmas Eve but I think they were a cute addition to my niece and nephew's presents :)
Hope you are all having a safe holiday season with family and friends!

Thursday, December 16, 2010

Crafting with Becky

Becky was looking to make a baby blanket for a friend from home, so we spent the evening crafting last night. I got some awesome flannel pretty cheap a while back just for this project and Becky was excited to test out her sewing skills. Turns out she's a pro - very straight lines, even stitches - you never would have known it was her first blanket! 


My dog, Poncho, thought it was so much fun - so she got right in on the action. This photo was too cute not to post!


Yahoo - the finished product - we were both so pleased with how well it worked out!


A close up of the fabric so you can see just how cute it is!

Wednesday, December 8, 2010

My crafts in action!

I'm a bit behind here...but also am working on some secret presents right now that can't be blogged for now.

In the meantime, here's a super cute pic of my niece wearing the hat I made her. When she saw the hat I had made for baby Kyra she said "Aunt Heidi can I please have it in pink with a purple flower." So here it is - not totally perfect since I had to invent the pattern to fit a 4.5 year old (the pattern I had was only for up to 18 months).

What a cutie!

Thursday, November 25, 2010

Jersey Scarf

In addition to the knitting needle case for Adam, I also had this jersey material I had pictured making into a cozy, cozy scarf because he is known to wear a scarf as his signature wardrobe piece.


While I love the finished product, I must confess this project was not as easy or fun to make as I thought it would be. I have not worked much with stretchy fabric and I am not sure if it's the thread I chose, the stitch I used or what but the thread kept breaking as I was sewing and it became tedious to repeatedly re-thread the machine. Luckily, Adam looks smashing in the scarf and it all worked out in the end.

I had 2 jersey fabrics - one solid and one striped. The scarf is reversible and where there is a striped piece, it is backed by a solid and vice versa. The finished scarf measures about 95 inches long and 12-14 inches wide. It's huge but allows for two full wraps around the neck and with the double layer of fabric Adam has reported it passes the cozy test! A good reminder that a challenging project is often worth the perseverance in the end.

My scarf is done!

You all saw when I had started this scarf - and it's been done for a week but I hadn't gotten around to blogging about it yet :)

Here it is.


It's gotten pretty chilly here the past couple days...and thankfully it is very warm. I had to buy another ball of the yarn to finish it off, and there is lots leftover so maybe I'll also work on mittens to match the set.

Monday, November 22, 2010

Knitting Needle Case

Happy Birthday Adam!

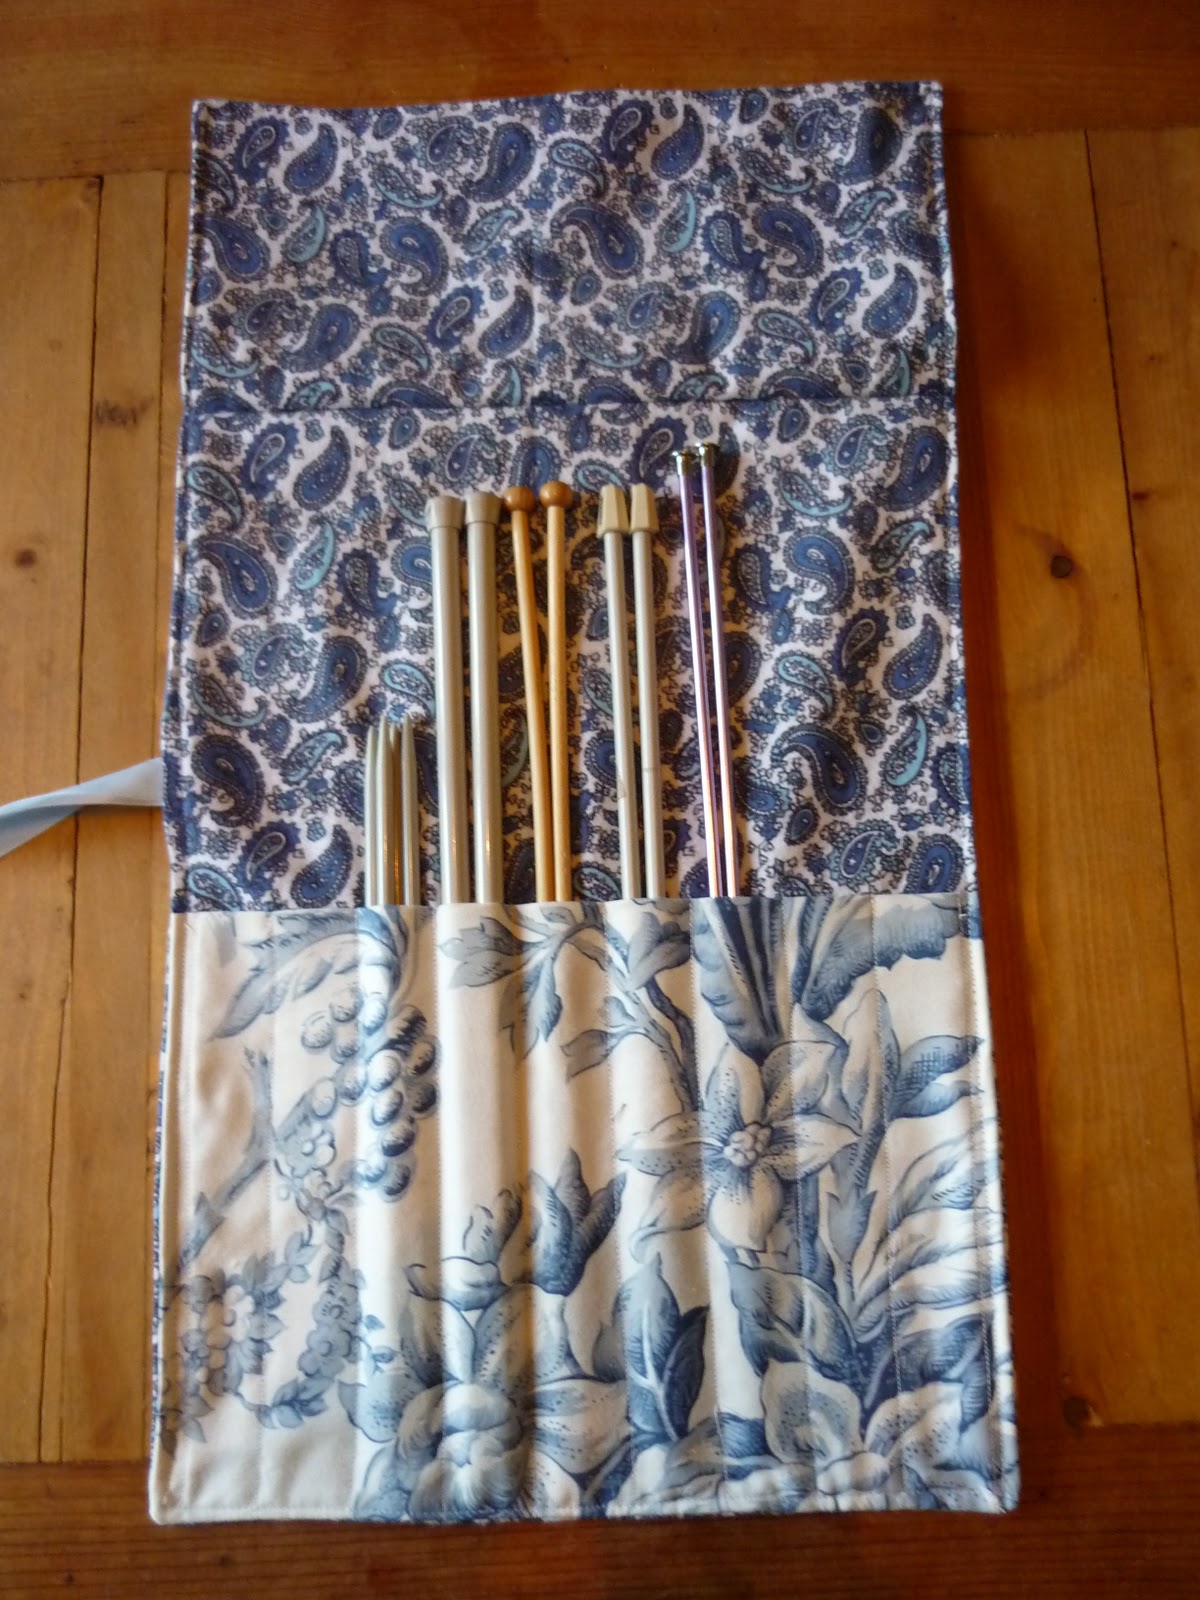
This gift was inspired by a knitting needle case I owned - I really wanted to make one for my friend Adam and was sure I could figure out how.
There is a pattern in Stitch and Bitch and originally I had cut out the fabric to make this one - but I was having a hard time visualizing how the pattern all came together as I thought the instructions were vague. So instead, I created my own pattern. And here it is.

Supplies:
2 pieces of fabric 20 inches long x 13 inches wide (I used 2 pieces of the same fabric, yours do not need to be)
1 piece of fabric 17 inches long x 13 inches wide
Ribbon - somewhere between 26-32 inch should be enough
Sewing machine, Pins, Taylor chalk

Here's how it all goes together:
1. Take your piece of fabric that is 17x 13 and fold it in half lengthwise so it is 8.5 inches long. Iron the fold.
2. With the open fold at the bottom, line it up with one of the 20x13 pieces (right side up). Pin it in place.

3. Draw the lines to create your knitting needle pockets. I made 10 pockets that were each about 1 inch wide. Conveniently, this is the width of my ruler, so it made it very easy to draw them on.

4. Sew along these lines - with all 3 layersof fabric together.

5. Now, make it so that the two 20x13 pieces are right sides together and pin around the edge.

6. Pin your ribbon into place (sorry there is not a good photo of this step). Fold it in half  and place it at one side, in the middle of the fabric. Pin it so that the length of the ribbon in sandwiched between the two piecs. (In these photos, the ribbon is a little higher than you may want it, I recommend putting it lower - I actually remade this one and modified it but did not take a photo)
7. Sew around but leave a 4-6 inch spot on the side open (or anywhere you want, but I chose the side) so that you can turn it right side out.
8. Before turning this right side out - I would suggest trimming any excess fabric that is around the edges - this makes for neater corners.
9. Turn right side out and using a sharp object (pencil, knitting needle) press out the corners and make them look like true corners.

10. Top stitch around the whole edge of the case, as close to the edge as you can comfortably get. The corners where there are many layers of fabric will be tricky - go slow and make sure your machine keeps on moving. Also make sure you are closing up the seam that you left open in order to turn it right side out.

11. You now need to make the flap that folds down at the top and makes sure the needles don't slide out. Place a knitting needle (preferably your tallest one) in the case, and then fold down the fabric - leaving maybe 3/4 or 1 inch of space at the top. Iron this fold and then sew a straight line across the top (with it folder down). This will make it stay in place easier.


12. You're done! Fill up the case and enjoy :)


Thursday, November 11, 2010

Something for Me

After making Dave's hat last week I thought it was time I finally used the yarn I bought over a year ago to make myself a hat and scarf.

The hat only took me 4 hours to make and I did it in one evening! Using this pattern and James C. Brett Marble Chunky yarn here is what I got:


I wore the hat for a couple days and realized it was a bit breezy around the ears. Considering it's not even snowy here yet and it will get a lot colder as the winter goes on I thought some modifications needed to be made. Here's my addition to the pattern :

I sewed a band of sweatshirt material into the base of the hat - and now it is so toasty warm!

I am loving the hat and have already received so many compliments. The pattern's a keeper.

I couldn't decide what scarf pattern to do - but after trying a few things I have settled on good old ribs and here's the start of it.


My new accessories make me almost excited for the cold weather to come! 


Monday, November 8, 2010

Blanket Binding Tutorial

I was excited to learn how to put the silk binding on a baby blanket as I really love the look of it. Through some trial and error I have finally figured it out and am pretty pleased with the product. So I thought I'd share my step-by-step method. While I had found some how-to stuff online - I might have appreciated some more details. Hopefully this will help someone else out.

1. Sew your two places of flannel or whatever fabric you've chosen together. I typically use a yard each of coordinating flannels. Be sure to iron them first.


2. Somewhere I read about doing a zig-zag stitch in addition to the straight stitch to put the two together. I am not sure what this is about but I do believe it makes things a bit sturdier.


3. I did not photograph this part, but iron your blanket binding - it will take a few moments but you'll be happy you did.

4. Make sure you have a thread colour that matches your binding. I made the mistake of trying to use a contrasting colour and instead it just showed all my mistakes. I ripped it out and had to buy new binding to do it again.

5. This part took me a bit to figure out and it may not be perfected yet. Start sewing the binding on close to the corner. You will use a zig zag stitch to sew the binding on. Most bindings have one side that is longer than the other (I have noticed that some I've bought do not have as noticable a difference). If you notice that one side is longer - put it at the back. That way it will always catch the stitch as long as you stay straight on the front.


6. Then I folded it to start the other edge. 


7. Pin all the way down the side. I found that lots of pins close together makes it a bit easier to sew. (I forgot to take a photo of this step with the pink binding, so here you see an older blanket).

8. Sew along the edge, all the way to the end.

 
9. Fold your corner like this (below). Then pin all the way down the side like in step 7 and sew like in step 8. Repeat until each side is sewn on. 


10. Go back to your corner and zig-zag stitch to hold it all together. This may be an unnecessary step but I was imagining little fingers getting stuck in the folds otherwise. I kind of like how it looks.


11. Finishing the final corner is probably the trickiest part, and I've only done it once so far as I had a different method for the first few blankets I did. This was hard to photograph and so may be harder to explain but basically you want to trim the binding and fold it appropriately to try and make it match the other corners. Using an iron to make the folds stay better before pinning and sewing really does help.


And there you go - you have a completed blanket!! Here are the two I made this weekend:


If I've missed anything or you have any questions - let me know!

Wednesday, November 3, 2010

The Fiancé Hat

I know I just wrote about Dave getting a hat not too long ago, but that hat was made a year ago now. And it seems to have become a tradition that I knit him a hat each year - so before I got going on any more baby projects (or perhaps a hat/scarf for myself), I thought I'd give Dave another option for keeping his ears warm. Winter has barely started and Dave already wears a hat everyday, so I'm happy for him to have one more home made one to choose from.

The name for this post comes from the original pattern name - The Boyfriend Hat. I used this pattern except knit it longer (7inches before I started decreasing) in an attempt to cover his ears - I was almost successful! I think as he wears it and it stretches a little, it will fit perfectly, but for now he may have to keep tugging it to cover his entire ears. I also CO 110 stitches instead of 100 - which worked out fine with the decreases for the crown. I used 4.5mm needles - I tried 5mm and the gauge seemed too loose.

I used Patons Classic Wool in Forest - of course it had to match the scarf I worked so hard on so I was sticking to the green/brown colours.

Here it is:


And the back:


The project went together much faster than I thought - I was motivated to have it done for Fibers on Friday and I am surprised it's Wednesday and I'm done.

Thanks to Stephanie for such a great pattern!

Sunday, October 31, 2010

Baby blankets, baby blankets & more baby blankets!

It seems that everytime I turn around another friend or family member is expecting a little one...and while I love knitting, I just couldn't keep up with them all. This is what mainly inspired me to get back into sewing - I knew this was a faster craft that could turn out some gorgeous blankets! Since April I've been experimenting with different blankets and love the quick yet lovely results.

I started out with the rag edge blanket - I doubted my skills at first and thought this was a safe place to start. They turned out okay and for anyone looking to make a home made gift that has some novice sewing skills, I highly recommend trying this one - very easy and very cozy!!


Then I moved onto a double sided blanket with a zig-szag stitch around the edge.


I even played around with a taggy blanket by special request for a little girl who loves the tags. I should also note that the plain pink fabric on the reverse is leftovers from some pants my mom made me in the early '80s!


My latest learning has been with the silky blanket binding. As a little girl, this was my favourite part of the blanket so I am pretty excited to have figured it out - I think it makes a polished and professional looking product.


Those are my adventures in learning to make some baby blankets - so much fun for me to play with coordinator fabrics as I learn. :)