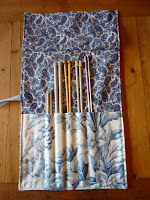
This gift was inspired by a knitting needle case I owned - I really wanted to make one for my friend Adam and was sure I could figure out how.
There is a pattern in Stitch and Bitch and originally I had cut out the fabric to make this one - but I was having a hard time visualizing how the pattern all came together as I thought the instructions were vague. So instead, I created my own pattern. And here it is.
Supplies:
2 pieces of fabric 20 inches long x 13 inches wide (I used 2 pieces of the same fabric, yours do not need to be)
1 piece of fabric 17 inches long x 13 inches wide
Ribbon - somewhere between 26-32 inch should be enough
Sewing machine, Pins, Taylor chalk
Here's how it all goes together:
1. Take your piece of fabric that is 17x 13 and fold it in half lengthwise so it is 8.5 inches long. Iron the fold.
2. With the open fold at the bottom, line it up with one of the 20x13 pieces (right side up). Pin it in place.
3. Draw the lines to create your knitting needle pockets. I made 10 pockets that were each about 1 inch wide. Conveniently, this is the width of my ruler, so it made it very easy to draw them on.
4. Sew along these lines - with all 3 layersof fabric together.
5. Now, make it so that the two 20x13 pieces are right sides together and pin around the edge.
6. Pin your ribbon into place (sorry there is not a good photo of this step). Fold it in half and place it at one side, in the middle of the fabric. Pin it so that the length of the ribbon in sandwiched between the two piecs. (In these photos, the ribbon is a little higher than you may want it, I recommend putting it lower - I actually remade this one and modified it but did not take a photo)
7. Sew around but leave a 4-6 inch spot on the side open (or anywhere you want, but I chose the side) so that you can turn it right side out.
8. Before turning this right side out - I would suggest trimming any excess fabric that is around the edges - this makes for neater corners.
9. Turn right side out and using a sharp object (pencil, knitting needle) press out the corners and make them look like true corners.
10. Top stitch around the whole edge of the case, as close to the edge as you can comfortably get. The corners where there are many layers of fabric will be tricky - go slow and make sure your machine keeps on moving. Also make sure you are closing up the seam that you left open in order to turn it right side out.
11. You now need to make the flap that folds down at the top and makes sure the needles don't slide out. Place a knitting needle (preferably your tallest one) in the case, and then fold down the fabric - leaving maybe 3/4 or 1 inch of space at the top. Iron this fold and then sew a straight line across the top (with it folder down). This will make it stay in place easier.


That is beautiful - what a great gift!
ReplyDeleteMaggie
That is NICE!
ReplyDelete